Bleed, safe area and trim
The printing process isn’t perfect, so to make sure your cards come out looking the best they can there are a few guidelines to follow. What we’re talking about are the Safe Area, Bleed, and Trim.
While these sound like complex (and painful) print terms, but they are actually quite simple once you get to know them.
|
|
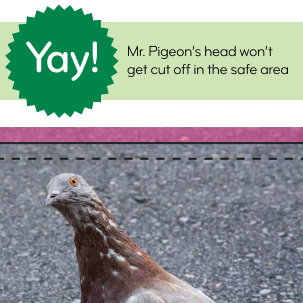
Safe Area |
This is an area within the trim where any text, important parts of photos, logos, and other critical parts of your design should be kept. Think of it like a “no-go zone” around the edges—anything outside the safe area is at risk of being trimmed off! |
||
| Trim |
The final size of your cards is referred to as the trim size. This is where we aim to cut your cards. Imagine you design a business card—before it’s cut, your design might include extra space around the edges (that’s the bleed). The trim line is where we make the final cut, so everything inside that line is what appears on your finished card. |
|||
| Bleed |
This is the area outside of the trim line that will get cut off, and while it ultimately gets removed it’s still important to the overall production of your product. Think of it like coloring outside the lines on purpose—so when we trim your cards, there are no awkward gaps or slivers of unprinted space. |
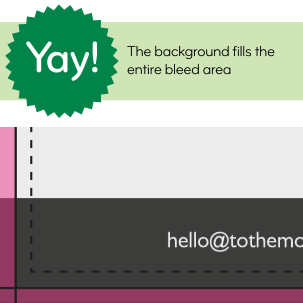
Bleed
Whether you’re using a photo or a solid color, you’ll want to make sure that the background of your design extends through and fills the bleed area. This makes sure that your design reaches all the way to the end of the card when trimmed and will prevent any ugly white edges.
Safe area